
Introduction
In this blog article, I will explain how to connect the ThinkNode G1 LoRaWAN gateway to AWS IoT Core using LoRa Basic Station mode. LoRaWAN (Long Range Wide Area Network) is a low-power wireless protocol designed for IoT devices that need to transmit small amounts of data over long distances.
This gateway can be purchased for 100€ on Aliexpress, which makes it the least expensive LoRaWAN gateway I was able to find! The gateway includes an external antenna and WiFi and Ethernet connectivity. The device can be powered using an included power adapter or via USB-C.
Prerequisites
Before starting, ensure you have:
- An AWS account with access to AWS IoT Core for LoRaWAN
- Basic networking knowledge
- An SSH client installed on your computer
- The ThinkNode G1 gateway and its accessories
Overview
To connect the gateway to AWS IoT Core for LPWAN, we will need to:
- Declare the gateway in AWS IoT Core
- Generate certificates from AWS
- Upload the certificates to the gateway
Let’s get started!
1. Create the Gateway in AWS IoT Core
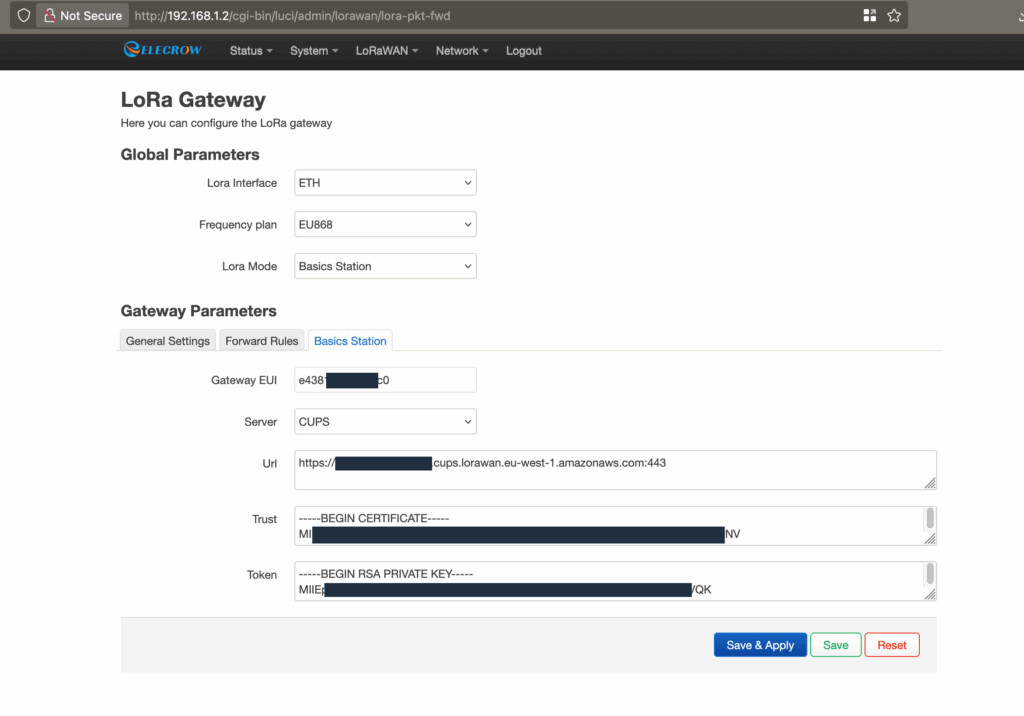
To create the gateway, you only need the gateway EUI (Extended Unique Identifier). In my case, the gateway EUI did not correspond to the one printed on the ThinkNode device. To retrieve the correct EUI, I had to connect to the gateway through WiFi and navigate to the LoRaWAN settings page, then select “Basic Station”. There, the correct gateway EUI was visible.
Accessing the Web Interface
The web interface is available at http://192.168.1.1/ when the device is in configuration mode. To enable this mode:
- Power on the device
- Press the “setup button” for 5 seconds
- The device will blink blue when in configuration mode
Please refer to the user manual to locate the setup button. I recommend reading this short manual first.
Creating the Gateway in AWS
Based on the EUI you retrieved, create a LoRaWAN gateway in AWS IoT using the console, CLI, or CDK. Please refer to the AWS documentation for detailed instructions: AWS LoRaWAN Onboard Gateway Guide.
Once created, AWS will generate the necessary certificates for authentication.
2. Upload Credentials to the Gateway
The gateway is designed to work with The Things Network, which requires TLS Server Authentication and a Client Token to connect to the LoRa server.
For AWS, we need to use TLS Server and Client Authentication, which requires a client certificate and its associated private key (instead of only an API token).
CUPS vs LNS Endpoints
I have chosen to connect to AWS using the Configuration and Update Server (CUPS) endpoint. During boot, the gateway will connect to this endpoint and retrieve information about the LoRa Network Server (LNS). This procedure works as well for the LNS endpoint if you prefer that approach.
The Challenge
This is where we encounter a problem: the web interface only allows you to set the API token.
Fortunately, the device allows SSH connection with the same credentials as the web interface (default username: root, password: root).
Understanding the Configuration Files
The LoRa Basic Station documentation explains that the following files are used for authentication:
*.trust: The server’s CA certificate, which enables the Station to establish trust with the LNS or CUPS server*.crt: The Private Station certificate*.key: The Private Station key or the API token*.uri: The URL of the endpoint
Based on this description, we can use the token field in the web interface to set the gateway private key. The only missing field is one for the gateway certificate.
Locating Configuration Files
To understand how the configuration works, I examined the device’s file system using these commands:
find / -name "*lora*" 2>/dev/null
find / -name "*station*" 2>/dev/null
Values set in the web page are copied into multiple configuration files:
/etc/config/lora_config/etc/config/lora-global/overlay/upper/etc/config/lora-global
The /overlay/upper/* files are created after updating LoRaWAN values in the web interface.
Looking at /etc/init.d/basicstation, I found this relevant code:
generate_global_conf()
{
    LORA_INTERFACE=$(uci get lora-global.global.lora_interface 2> /dev/null)
    URL=$(uci get lora-global.gateway_conf.url 2> /dev/null)
    MODE=$(uci get lora-global.global.lora_mode 2> /dev/null)
    SERVER=$(uci get lora-global.gateway_conf.server 2> /dev/null)
    if [ "$LORA_INTERFACE" = "Ethernet" ] || [ "$LORA_INTERFACE" = "WLAN" ] || [ "$LORA_INTERFACE" = "LTE" ]
    then
        if [ -z "$URL" ]
        then
            logger "basicstation not configured, do not start it"
            return 1
        else
            logger "basicstation configured begin"
        fi
    else
        logger "lora is not enabled, do not start it"
        return 1
    fi

    if [ "$MODE" = "basicstation" ]
    then
        if [ "$SERVER" = "LNS" ]
        then
            uci get lora-global.gateway_conf.url > /usr/LNS/tc.uri
            uci get lora-global.gateway_conf.trust > /usr/LNS/tc.trust
            uci get lora-global.gateway_conf.token > /usr/LNS/tc.key
            sync
        else
            uci get lora-global.gateway_conf.url > /usr/CUPS/cups.uri
            uci get lora-global.gateway_conf.trust > /usr/CUPS/cups.trust
            uci get lora-global.gateway_conf.token > /usr/CUPS/cups.key
            sync
        fi
    else
        logger "lora is not enabled, do not start it"
        return 1
    fi
}
Adding the Certificate File
Authentication files are created in /usr/CUPS/ and /usr/LNS/ based on the server type used.
Step-by-step process:
-
First, configure all the values you can through the web interface (URL, trust certificate, and use the private key in the token field)
-
Then, SSH into the gateway and add the certificate file using the
catcommand:
cat >> /usr/CUPS/cups.crt << EOF
-----BEGIN CERTIFICATE-----
YOUR_CERTIFICATE_CONTENT_HERE
-----END CERTIFICATE-----
EOF
(Replace YOUR_CERTIFICATE_CONTENT_HERE with your actual certificate content from AWS)
-
If using LNS instead of CUPS, use
/usr/LNS/tc.crtinstead -
Reboot the gateway or restart the basicstation service
The gateway is now properly configured! Don’t forget to configure the network/wireless access settings as well.
3. Overlapping IP with Proximus B-Box
Important Warning for Belgian Users:
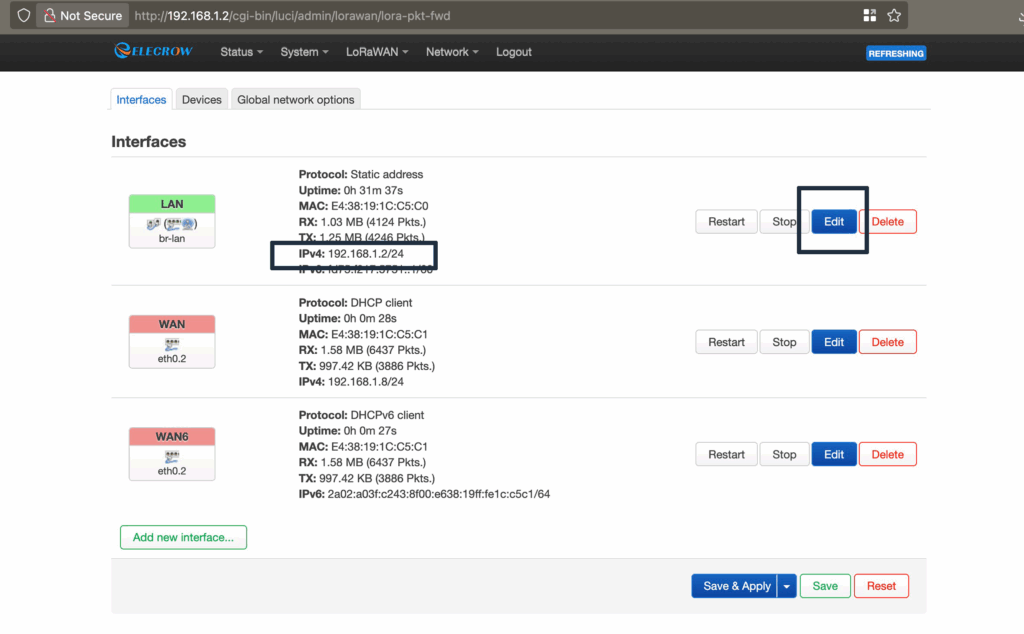
The device comes configured to use static IP 192.168.1.1, which is the same as the one used by Proximus internet boxes in Belgium. You can change this IP in the network configuration page to 192.168.1.2. By doing so, you will avoid blocking the B-Box (which needs to be reset, and takes 45 minutes to do so). You will also need to use the new IP to connect to the webinterface and SSH later on (in configuration mode).
To change the IP:
- Go to the Network configuration page in the web interface
- Change the static IP from
192.168.1.1to192.168.1.2(or another available address) - Save the settings and reboot
Conclusion
The ThinkNode G1 gateway is an affordable option for LoRaWAN connectivity, and with these steps, you can successfully connect it to AWS IoT Core. While the process requires some command-line work to add the certificate file, it’s straightforward once you understand the file structure.
Message:
Hi Maximilien,
Thanks for your guide about the ThinkNode G1 and AWS. I followed everything exactly and the
gateway does connect to AWS, so that part works.
But I still don’t see any uplinks — not the automatic one the gateway sends every minute on
TTN, and also not the uplinks from my end device.
Did you actually see uplinks on AWS when you tried it? And did your end device work right
away?
Thanks,
Elroi Krauz
Hello Elroi, I am happy to see that this post is useful. When using the gateway with AWS the “Last uplink received” in AWS console can stay at the same timestamp for multiple hours. It is currently 15h31 and I see a gateway with a last uplink at 10:41, this is a gateway place where there is no sensor transmitting.
I am using LoRaWAN sensors in my home for my gaz, water and electrical metering, I get a message a least every 15 minutes from my electricity meter and this gateway forward properly the message to AWS.
Hi Maximilian,
I’m working on automating our gateway setup and was wondering: is it possible to handle the
entire configuration (Base Station and LNS) strictly via SSH? My goal is to be able to paste a
script or a series of commands into the terminal to configure everything automatically.
We’ve successfully managed to retrieve the necessary details from AWS automatically, but we
haven’t been able to create a script that successfully establishes the connection to AWS IoT
Core. Do you have any tips or examples for scripting that connection part via SSH?
I think it would be possible to do it. I would suggest setting the gateway to factory settings, connect in SSH copy all files to your computer (especially files in usr/, /etc/config/lora_config, /etc/config/lora-global and /overlay/upper/ folder), then configure the gateway to be able to connect to AWS and finally, copy again the file and compare them.
I expect you will have files in /etc/config/ file for lora configuration, in usr/ for the certificates and in /overlay/upper/ with the other parameters set during setup using the web interface.